Once you’ve set up your Summit Evergreen course and have acquired students for it, at some point it may become necessary for you to change the course start date for one of your students. To do so, do the following:
- In the left navigation menu, select “Students”, then “Users”
- In the left pane, you will see a list of student names – select the student whose start date you’d like to change (to do so, you can scroll through the student list or search for the student’s name or email address)
- In the right pane you will see that student’s information and a menu in the upper right corner
- In the upper right corner menu, select “Products” – this will show the courses / products the student currently has
- For the course for which you’d like to change the student’s start date, hit the “Delete” button to the right of the course name
- This will delete the course from the student’s current products list and show its status with a “Deleted” message


- Below the student’s product list, select the “Add Purchase” box
- This will bring up a box that will allow you to create a new purchase
- Here, input the new course start date you’d like to use and choose the same course you just deleted
- Hit “Save” – this will add this course back to the student’s course list with the changed course start date


- If, in this course, you have Summit Evergreen send a welcome email when the course is purchased, you may want to turn it off while you are updating the course start date, and then turn it on again after you’ve made your start date change. If you don’t, then your student will receive a second welcome email. To do this, do the following:
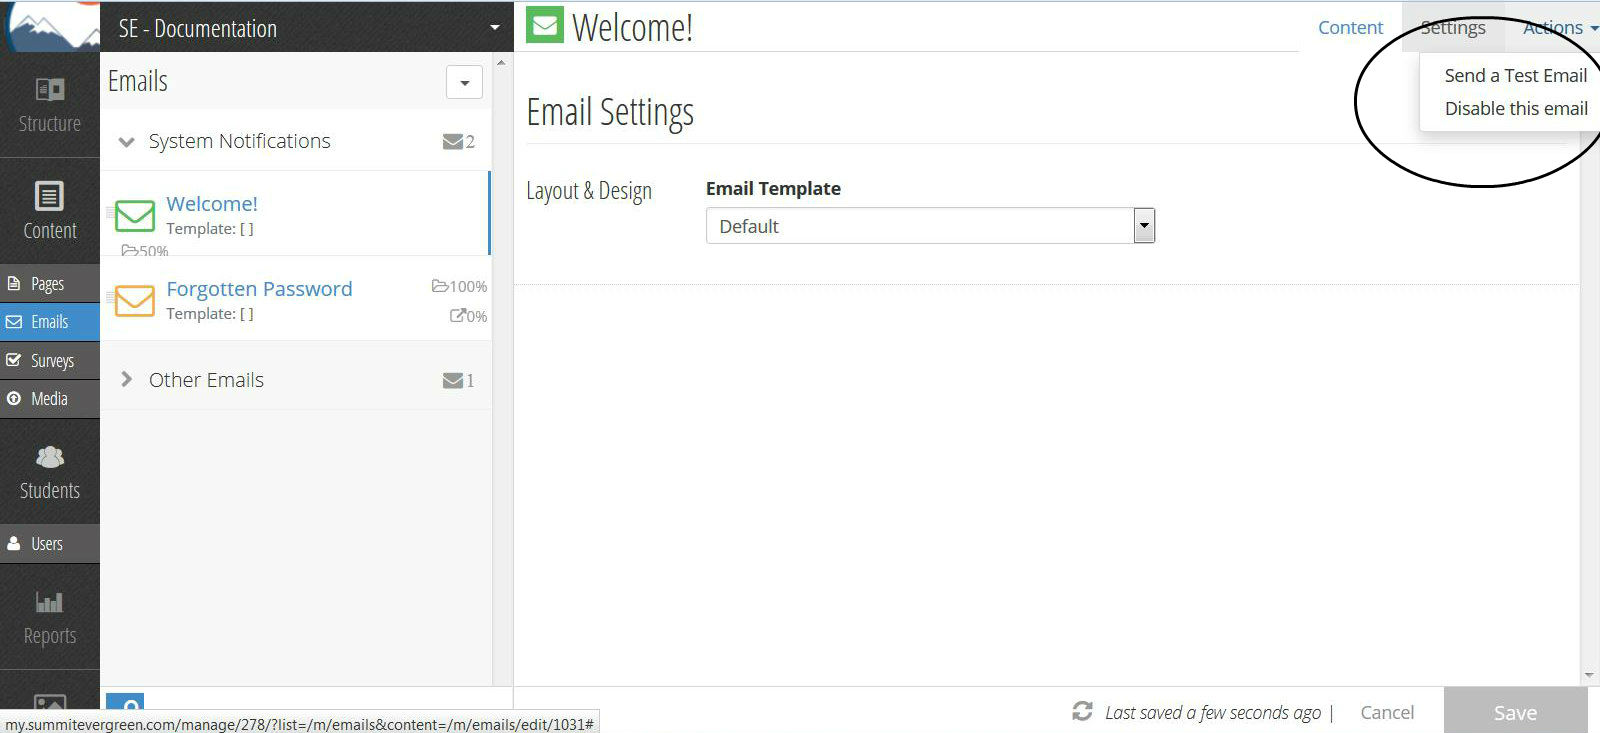
- In the left navigation menu, select “Content”, then “Emails”
- In the left pane, you will see the welcome email for your course
- In the lower left corner, you will see a lock icon – click on it to unlock editing capability
- Select “Welcome Email”
- In the right pane you will see the email content and a menu in the upper right corner
- In the upper right corner menu, select “Actions”
- This will bring up a dropdown menu – to disable the welcome email, select “Disable this email”
- Click on the lock icon in the lower left corner again – this will save all changes and re-lock editing capability
- After completing your start date change, follow these instructions again – this time, in the “Actions” dropdown menu, select “Re-enable this email” to enable the welcome email again
- Click on the lock icon in the lower left corner again – this will save all changes and re-lock editing capability

